Arduino Tutorial EEPROM Circuit Diagram Video demonstrates how write and read from external EEPROM(24LC256) using Arduino with I2C communication protocol.For code to read and write to EEPROM see:ht

EEPROM is a very fundamental feature of Arduino and it has internal EEPROM for this purpose. But sometimes, we need some more to use. In that situation, some dedicated EEPROM ICs like 24Cxxx ICs. In this article, we are going to interface external EEPROM with Arduino. So let's start!
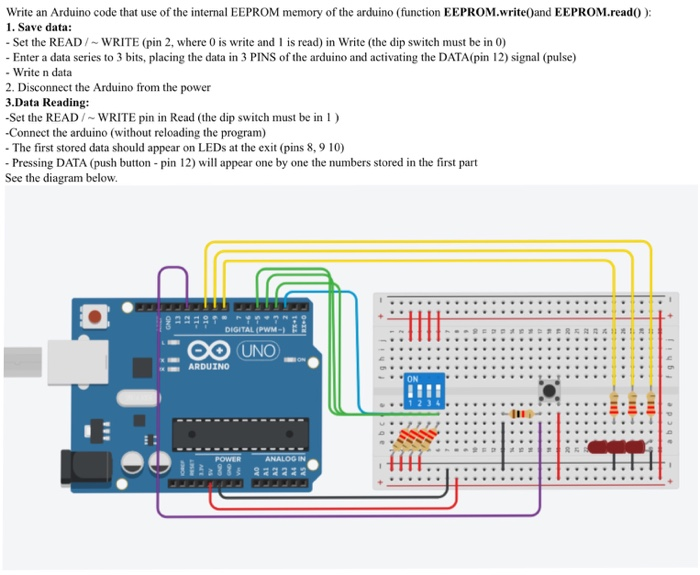
EEPROM with Arduino Circuit Diagram
Reading and Writing Data to External EEPROM Using Arduino: EEPROM stands for Electrically Erasable Programmable Read-Only Memory. EEPROM is very important and useful because it is a non-volatile form of memory. This means that even when the board is powered off, the EEPROM chip still retains the program tha…

Using External EEPROM. If the limited amount of nonvolatile storage in the Arduino is insufficient for your application then you can add an external EEPROM. Using an I2C device simplifies both the wiring and code. AT24LC256 EEPROM. The AT24LC256 is a 256 Kilobit EEPROM. As there are eight bits in a byte this translates to 32 Kb of nonvolatile This library contains two types of class; first one is eeWrite which writes to EEPROM, second one is eeRead which reads from EEPROM. First; you should include the Arduino.h; Main include file for the Arduino SDK and define the EEPROM address; within this library we will use the 0x50; which is addressing i 2 C adr = 0b1010 000 0 . It is actually depends on your wiring and EEPROM. Reading/Writing Serial EEPROM via I2C using an Arduino UNO is a process that entails communication with an external Serial EEPROM device through the use of the I2C protocol. This process provides a means by which an Arduino UNO can store and retrieve data from the Serial EEPROM device, thus expanding the available memory of the Arduino.
How to Read Write External EEPROM with arduino Circuit Diagram
This is Arduino programming tutorial on how to read and write string text to an external EEPROM using I2C serial communication protocol. In this external EEPROM programming example we will be using microchip AT24C32A serial I2C EEPROM. We will be using two push button to write and read to the EEPROM device.